Patrick O’Malley, MD
Section Editor, Wound Management
 There is a lot of confusion amongst clinicians when it comes to suture materials and their names. Terms such as monofilament, braided, and polypropylene get thrown around a lot, and we often do not have this explained to us. Furthering the confusion is the interchangeable use of the generic and trade names. For the sake of simplicity, let’s break it down into absorbable vs non-absorbable. See Diagram 1 below. The arrows indicate the preferred type of suture material to have readily available to handle almost all situations in the Urgent Care setting.
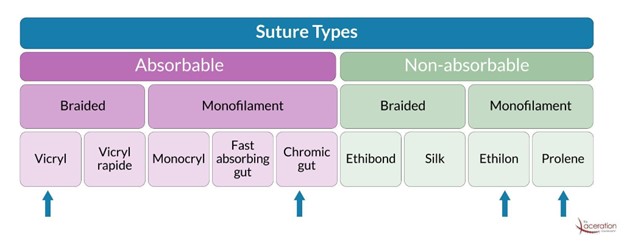
Absorbable sutures (what a lay person would call dissolvable) are primarily used for deep sutures. These are treated with different agents or processes to facilitate more rapid degradation. Common options include chromic gut, fast absorbing plain gut, or polyglactin (Vicryl, Vicryl Rapide). They can be used externally and are being advocated for use in the pediatric population or for patients who may not reliably return for suture removal. (1)
Non-absorbable sutures can be categorized into braided or monofilament, most UCC and emergency departments use non-braided monofilament exclusively. The main options here are polypropylene (Prolene) or nylon (Ethilon) These have some subtle differences, with polypropylene being a bit more rigid, whereas nylon has some “elasticity,” or stretch, when pulled. Both nylon and polypropylene suffer from the characteristic known as “memory.” (2) This is seen when the suture is removed from the package and it retains the shape it held in the package. This is more prominent with larger gauge material (3.0 vs. 6.0) The memory characteristic can be overcome by pulling the suture material through your fingernails to straighten it out. Another trick is to cut the suture thread in half if you are only putting in a few sutures, making the thread more manageable. A quick demonstration can be seen here.
Choosing one monofilament over the other likely comes down to personal preference and past experience. Try both out for yourself and see what has a better feel for you, as patient outcomes are felt to be similar. That being said, I do recommend polypropylene (Prolene) when you are suturing in hairy areas such as eyebrows, beards and mustaches. This is because blue (Prolene) is much easier to see when placing sutures and when they come back in for suture removal. Fun fact: The reason we don’t have fluorescent-colored suture material is that the dye needed to provide the color is not FDA approved for human use but is available for veterinary use.
Now that we know what we are using, let’s discuss how we use it. Suturing is something that we all do frequently, but how much attention have you devoted to your technique? How do you properly tie a suture knot? What exactly is a surgeon’s knot? We all place a “few throws” down, but have you ever paid close attention to the mechanics of this? The surgeon’s knot is defined as:
A surgical knot is a simple modification to the reef knot. It adds an extra twist when tying the first throw, forming a double overhand knot. The additional turn provides more friction and can reduce loosening while the second half of the knot is tied (3-5).
The instrument tie is the cornerstone of suturing wounds. Our goal is to create a “squared knot” that is secure and does not unravel after it has been tied. Improper technique may lead to sutures coming out and wound dehiscence. Once the thread has been passed through the tissue, pull the distal end or “tail” until there is about an inch or so of material available for you to grab with the needle driver to tie your knots. Too small of a tail makes it difficult to grab and tie. Leaving the tail too long will cause the tail to get caught in the knot when tying it and will use more suture material than necessary. This could result in needing a second package…and it’s expensive!
Follow this link for a detailed video tutorial. Place the needle driver over the center of the wound and wrap over and around the needle driver towards the tail end of the thread two times. Open the needle driver, grasp the tail and pull in the opposite direction so the suture material lies down flat over the wound. Place the needle driver over the center of the wound, wrap the thread around the needle driver, towards the tail one time, grasp the tail of the thread and pull in the opposite direction from your first “throw”. You now have completed a squared knot. Do this 2-3 more times, making sure that you go in the opposite direction each time. This is the key. You have to go in the opposite direction each time. If you repeatedly pull the tail in the same direction, you get a knot that is more likely to unravel, which can lead to suture failure and wound dehiscence. See Diagram 2 below.
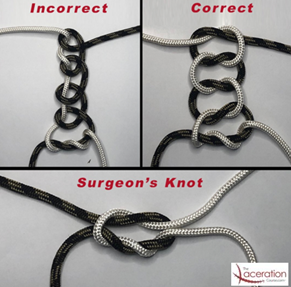
The actual number of throws needed will depend on what type and size suture material being used. 3.0 nylon such as Prolene may require 4-5 throws, whereas 6.0 absorbable may do fine with 3. Lastly, cut the ends of the suture material with your scissors. Leave a few millimeters of thread above the knot, as cutting too close may lead to the knot unraveling. I recommend leaving the tails longer when repairing a wound in an area with hair, such as an eyebrow. This allows for easier identification and removal of the sutures. Diagram 2 also demonstrates the end result of both proper and improper technique.
To many of you this may seem elementary and basic, but I encourage you to take a closer look at your practice and ensure that you are doing it correctly.
You can reach Dr. O’Malley at:
omalleypat@mac.com | 803-260-9705
To learn more about mastering the art of suturing and laceration management, check out
The Laceration Course at www.thelacerationcourse.com
REFERENCES:
1 – Karounis H, Gouin S, Eisman H, Chalut D, Pelletier H, Williams B. A randomized, controlled trial comparing long-term cosmetic outcomes of traumatic pediatric lacerations repaired with absorbable plain gut versus nonabsorbable nylon sutures. Acad Emerg Med. 2004;11(7):730-735. doi:10.1197/j.aem.2003.12.029
2 -Choosing the right suture material. Choosing the right suture material – DolceraWiki. https://www.dolcera.com/wiki/index.php/Choosing_the_right_suture_material. Accessed December 8, 2022.
3 – Day, Cyrus Lawrence (1986). The Art of Knotting and Splicing (4th ed.). Annapolis: Naval Institute Press. p. 42. ISBN 978-0870210624.
4 – Ashley, Clifford W. (1944). The Ashley Book of Knots. New York: Doubleday. p. 75. ISBN 978-0385040259.
5 – Budworth, Geoffrey (1999). The Ultimate Encyclopedia of Knots. London: Hermes House. p. 54. ISBN 9781859679111.
https://pubmed.ncbi.nlm.nih.gov, accessed online 10/31/22